Creating a WebSockets middleware for ASP .NET Core 3
This article was originally written in December 2016, and has been updated in November 2019 to the latest .NET Core 3 version. The updated code samples can be found in the
dotnetcore3branch of the GitHub repository.
This article explores the low-level websockets API in .NET Core 3, and builds a websockets middleware for ASP.NET Core 3. If you are looking at adding real-time functionality to your .NET application, you should first explore SignalR.
This is an educational project with the goal of better understanding how WebSockets are handled at a lower level then SignalR.
In the traditional paradigm of the web, the client was the one responsible for initiating the communication with a server, and the server could not send data back unless it had been previously requested by the client. With WebSockets, you can send data between the server and the client over a single TCP connection, and usually WebSockets are used to provide real-time functionality to modern applications.

You can find a repository containing the source code of this article on GitHub.
You should first familiarize yourself with WebSockets in .NET Core - this article provides a great introduction.
ASP .NET Core Middleware
First of all, it is important to understand what middleware is and how the new request pipeline works in ASP .NET Core, and there is a great article on that from the Official ASP .NET Core Documentation.
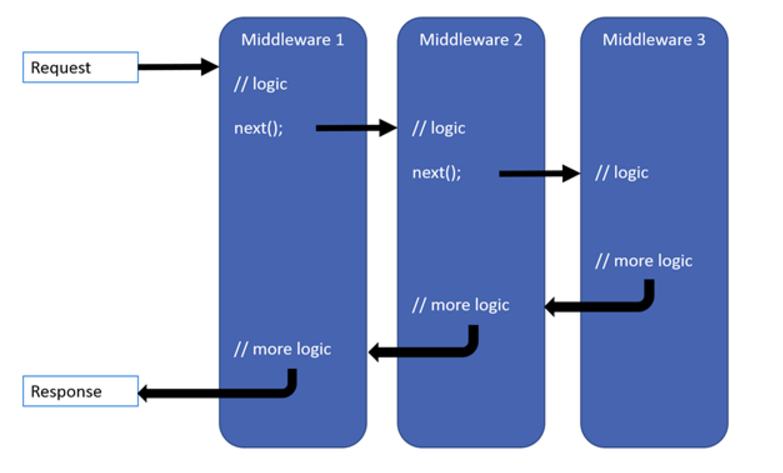
Middleware are software components that are assembled into an application pipeline to handle requests and responses. Each component chooses whether to pass the request on to the next component in the pipeline, and can perform certain actions before and after the next component is invoked in the pipeline. Request delegates are used to build the request pipeline. The request delegates handle each HTTP request.
The new pipeline consists of a series of RequestDelegate objects being called one after the next, and each component can perform operations before and after the next delegate, or can short-circuit the pipeline, handle the request itself and not pass the context further.
Before writing the middleware itself, we need a few classes that deal with connections and handling messages.
Writing a WebSocket Connection Manager
The first thing we notice when using the WebSocket package is that everything is low-level: we deal with individual connections, buffers and cancellation tokens. There is no built-in way of storing sockets, nor are they identified in any way. So we’re building a class that keeps all active sockets in a thread-safe collection and assigns each a unique ID, while also maintaining the collection (getting, adding and removing sockets).
public class ConnectionManager
{
    private ConcurrentDictionary<string, WebSocket> _sockets = new ConcurrentDictionary<string, WebSocket>();

    public WebSocket GetSocketById(string id)
    {
        return _sockets.FirstOrDefault(p => p.Key == id).Value;
    }

    public ConcurrentDictionary<string, WebSocket> GetAll()
    {
        return _sockets;
    }

    public string GetId(WebSocket socket)
    {
        return _sockets.FirstOrDefault(p => p.Value == socket).Key;
    }
    public void AddSocket(WebSocket socket)
    {
        _sockets.TryAdd(CreateConnectionId(), socket);
    }

    public async Task RemoveSocket(string id)
    {
        WebSocket socket;
        _sockets.TryRemove(id, out socket);

        await socket.CloseAsync(closeStatus: WebSocketCloseStatus.NormalClosure,
                                statusDescription: "Closed by the ConnectionManager",
                                cancellationToken: CancellationToken.None);
    }

    private string CreateConnectionId()
    {
        return Guid.NewGuid().ToString();
    }
}
Notice the use of a ConcurrentDictionary for the collection - this is because we will try using the collection from multiple user requests concurrently.
Writing a WebSocket Handler
Now that we have a way of keeping track of the connected clients, we want a class that handles connection and disconnection events and manages sending and receiving messages from the socket. Let’s see how a class like this might look like:
public abstract class WebSocketHandler
{
    protected ConnectionManager WebSocketConnectionManager { get; set; }

    public WebSocketHandler(ConnectionManager webSocketConnectionManager)
    {
        WebSocketConnectionManager = webSocketConnectionManager;
    }

    public virtual async Task OnConnected(WebSocket socket)
    {
        WebSocketConnectionManager.AddSocket(socket);
    }

    public virtual async Task OnDisconnected(WebSocket socket)
    {
        await WebSocketConnectionManager.RemoveSocket(WebSocketConnectionManager.GetId(socket));
    }

    public async Task SendMessageAsync(WebSocket socket, string message)
    {
        if(socket.State != WebSocketState.Open)
            return;

        await socket.SendAsync(buffer: new ArraySegment<byte>(array: Encoding.ASCII.GetBytes(message),
                                                                offset: 0,
                                                                count: message.Length),
                                messageType: WebSocketMessageType.Text,
                                endOfMessage: true,
                                cancellationToken: CancellationToken.None);
    }

    public async Task SendMessageAsync(string socketId, string message)
    {
        await SendMessageAsync(WebSocketConnectionManager.GetSocketById(socketId), message);
    }

    public async Task SendMessageToAllAsync(string message)
    {
        foreach(var pair in WebSocketConnectionManager.GetAll())
        {
            if(pair.Value.State == WebSocketState.Open)
                await SendMessageAsync(pair.Value, message);
        }
    }

    public abstract Task ReceiveAsync(WebSocket socket, WebSocketReceiveResult result, byte[] buffer);
}
The first thing to notice is that the class is abstract. This means you need to inherit it and provide actual implementation for the ReceiveAsync method, and that you can override the methods marked as virtual and provide custom logic for the OnConnected and OnDisconnected methods that are executed whenever a new socket connects, or when an existing one sends a Close message.
There is also the SendMessageAsync which sends a message to a specific socketId and SendMessageToAllAsync, which sends a message to all connected clients.
The middleware itself
So far we built classes that help maintaining a record of connected sockets and handle sending and receiving messages to and from those sockets. Now it’s time to build the actual middleware:
As any middleware, it needs to receive a RequestDelegate for the next component in the pipeline, while executing operations on the HttpContext before and after invoking the next component, and it needs an async Task Invoke method. It doesn’t have to inherit or implement anything, just to have the Invoke method.
public class WebSocketManagerMiddleware
{
    private readonly RequestDelegate _next;
    private WebSocketHandler _webSocketHandler { get; set; }

    public WebSocketManagerMiddleware(RequestDelegate next,
                                        WebSocketHandler webSocketHandler)
    {
        _next = next;
        _webSocketHandler = webSocketHandler;
    }

    public async Task Invoke(HttpContext context)
    {
        if(!context.WebSockets.IsWebSocketRequest)
            return;

        var socket = await context.WebSockets.AcceptWebSocketAsync();
        await _webSocketHandler.OnConnected(socket);

        await Receive(socket, async(result, buffer) =>
        {
            if(result.MessageType == WebSocketMessageType.Text)
            {
                await _webSocketHandler.ReceiveAsync(socket, result, buffer);
                return;
            }

            else if(result.MessageType == WebSocketMessageType.Close)
            {
                await _webSocketHandler.OnDisconnected(socket);
                return;
            }

        });
    }

    private async Task Receive(WebSocket socket, Action<WebSocketReceiveResult, byte[]> handleMessage)
    {
        var buffer = new byte[1024 * 4];

        while(socket.State == WebSocketState.Open)
        {
            var result = await socket.ReceiveAsync(buffer: new ArraySegment<byte>(buffer),
                                                    cancellationToken: CancellationToken.None);

            handleMessage(result, buffer);
        }
    }
}
The middleware is passed an implementation of WebSocketHandler and a RequestDelegate. If the request is not a WebSocket request, it is short-circuiting the middleware and return. If it is a WebSockets request, then it accepts the connection and passes the socket to the OnConnected method from the WebSocketHandler.
Then, while the socket is in the Open state, it awaits for new data. When it receives new data, it decides wether to pass the context to the ReceiveAsync method of WebSocketHandler (notice why you need to pass an actual implementation of the abstract WebSocketHandler class) or to the OnDisconnected method (if the message type is Close).
The extension methods for adding the middleware
Most likely in modern applications you want to send notifications and messages only to clients connected to a specific part of the application (think SignalR Hubs).
With this middleware, you can map different paths of your application with specific implementations of WebSocketHandler, so you would get completely isolated environments (and different instances of WebSocketConnectionManager, but more on this later).
So mapping the middleware is done using the following extension method on IApplicationBuilder:
public static IApplicationBuilder MapWebSocketManager(this IApplicationBuilder app,
                                                        PathString path,
                                                        WebSocketHandler handler)
{
    return app.Map(path, (_app) => _app.UseMiddleware<WebSocketManagerMiddleware>(handler));
}
It receives a path and it maps that path using with the WebSocketManagerMiddleware which is passed the specific implementation of WebSocketHandler you provided as argument for the MapWebSocketManager extension method.
You also need to add some services in order to use them, and this is done in another extension method on IServiceCollection:
public static IServiceCollection AddWebSocketManager(this IServiceCollection services)
{
    services.AddTransient<ConnectionManager>();

    foreach(var type in Assembly.GetEntryAssembly().ExportedTypes)
    {
        if(type.GetTypeInfo().BaseType == typeof(WebSocketHandler))
        {
            services.AddSingleton(type);
        }
    }

    return services;
}
Besides from adding the WebSocketConnectionManager service, it also searches the executing assembly for types that inherit WebSocketHandler and it registers them as singleton (so that every request gets the same instance of the message handler) using reflection.
Now we will take a look at how we would use it in ASP .NET Core applications, and just like in the case of SignalR, there are two scenarios for usage:
- one where the client actually sends WebSockets requests
- one where the client does some MVC stuff and other clients get notified
Scenario 1 - Client Sending messages through WebSockets
Using the middleware we just created we will build a chat application (I know, everybody shows chat applications when playing around with WebSockets).
In order use the newly created middleware, we need to call the extension method MapWebSocketManager inside a new project’s Startup class.
public class Startup
{
    // This method gets called by the runtime. Use this method to add services to the container.
    // For more information on how to configure your application, visit https://go.microsoft.com/fwlink/?LinkID=398940
    public void ConfigureServices(IServiceCollection services)
    {
        services.AddWebSocketManager();
    }

    // This method gets called by the runtime. Use this method to configure the HTTP request pipeline.
    public void Configure(IApplicationBuilder app, IWebHostEnvironment env)
    {
        var serviceScopeFactory = app.ApplicationServices.GetRequiredService<IServiceScopeFactory>();
        var serviceProvider = serviceScopeFactory.CreateScope().ServiceProvider;

        app.UseWebSockets();
        app.MapWebSocketManager("/ws", serviceProvider.GetService<ChatMessageHandler>());
        app.UseStaticFiles();
    }
}
First we need to UseWebSockets(), then map the paths you want to be handled by the middleware.
We said that we need to pass the MapWebSocketManager method an implementation of WebSocketHandler. Remember that in the extension method we registered all types that inherited WebSocketHandler as singletons in the framework. So at this moment we can use the IServiceProvider to give us instances of those classes.
Let’s have a look at an actual implementation of WebSocketHandler, ChatMessageHandler:
public class ChatMessageHandler : WebSocketHandler
{
    public ChatMessageHandler(ConnectionManager webSocketConnectionManager) : base(webSocketConnectionManager)
    {
    }

    public override async Task OnConnected(WebSocket socket)
    {
        await base.OnConnected(socket);

        var socketId = WebSocketConnectionManager.GetId(socket);
        await SendMessageToAllAsync($"{socketId} is now connected");
    }

    public override async Task ReceiveAsync(WebSocket socket, WebSocketReceiveResult result, byte[] buffer)
    {
        var socketId = WebSocketConnectionManager.GetId(socket);
        var message = $"{socketId} said: {Encoding.UTF8.GetString(buffer, 0, result.Count)}";

        await SendMessageToAllAsync(message);
    }
}
It overrides the OnConnected method to send a message to everybody broadcasting that a new client connected and it implements the ReceiveAsync method (by just broadcasting the method to all clients).
At this point, you can create a new message handler to separate the clients connected on a page from another, since there will be separate collections of connections.
Now let’s add a web client that connects through WebSockets:
<input type=text id="textInput" placeholder="Enter your text"/>
<button id="sendButton">Send</button>

<ul id="messages"></ul>

    <script language="javascript" type="text/javascript">
    var uri = "ws://" + window.location.host + "/ws";
    function connect() {
        socket = new WebSocket(uri);
        socket.onopen = function(event) {
            console.log("opened connection to " + uri);
        };
        socket.onclose = function(event) {
            console.log("closed connection from " + uri);
        };
        socket.onmessage = function(event) {
            appendItem(list, event.data);
            console.log(event.data);
        };
        socket.onerror = function(event) {
            console.log("error: " + event.data);
        };
    }
    connect();
    var list = document.getElementById("messages");
    var button = document.getElementById("sendButton");
    button.addEventListener("click", function() {

        var input = document.getElementById("textInput");
        sendMessage(input.value);

        input.value = "";
    });
    function sendMessage(message) {
        console.log("Sending: " + message);
        socket.send(message);
    }
    function appendItem(list, message) {
        var item = document.createElement("li");
        item.appendChild(document.createTextNode(message));
        list.appendChild(item);
    }
</script>
This is a very simple web page that has an input form and a button. It connects to the server on the “/ws” path, so all requests will be mapped to ChatMessageHandler (recall how ChatMessageHandler was mapped to receive requests on the /ws path).

We can see that messages are passed real-time to all connected clients.
Scenario 2 - Receiving real-time notifications from a controller
This time we will build an MVC application and have client send data through the MVC pipeline. Then, the notifications would get fired from within the controller.
We will build a standard MVC application and we will add the WebSocketManagerMiddleware we created. Here’s the Startup class of this application:
public void Configure(IApplicationBuilder app, IWebHostEnvironment env)
{
    var serviceScopeFactory = app.ApplicationServices.GetRequiredService<IServiceScopeFactory>();
    var serviceProvider = serviceScopeFactory.CreateScope().ServiceProvider;

    app.UseWebSockets();
    app.MapWebSocketManager("/ws", serviceProvider.GetService<NotificationsMessageHandler>());
    app.UseStaticFiles();
    app.UseEndpoints(endpoints =>
    {
        endpoints.MapControllers();
    });
}
Since this time the handler class only manages the connected clients and will not handle requests itself, we can leave the ReceiveAsync method unimplemented:
public class NotificationsMessageHandler : WebSocketHandler
{
    public NotificationsMessageHandler(WebSocketConnectionManager webSocketConnectionManager) : base(webSocketConnectionManager)
    {
    }

    public override Task ReceiveAsync(WebSocket socket, WebSocketReceiveResult result, byte[] buffer)
    {
        throw new NotImplementedException();
    }
}
And the controller:
public class MessagesController : Controller
{
    private NotificationsMessageHandler _notificationsMessageHandler { get; set; }

    public MessagesController(NotificationsMessageHandler notificationsMessageHandler)
    {
        _notificationsMessageHandler = notificationsMessageHandler;
    }

    [HttpGet]
    public async Task SendMessage([FromQueryAttribute]string message)
    {
        await _notificationsMessageHandler.SendMessageToAllAsync(message);
    }
}
In the controller we will have a NotificationsMessageHandler instance that will handle the sending of notifications to all connected clients.
The HTML page is very similar to the previous ones, but this time the message will be sent using the API we created, so through HTTP and not WebSockets, so only the sendMessage method is different:
function sendMessage(message) {
    console.log("Sending: " + message);

    $.ajax({
        url: "http://" + window.location.host + "/api/messages/sendmessage?message=" + message,
        method: 'GET'
    });
}
Let’s see how it works:
The user doesn’t notice any difference, but the client is sending data through an HTTP request and receiving notifications through WebSockets.
Extra - Console client
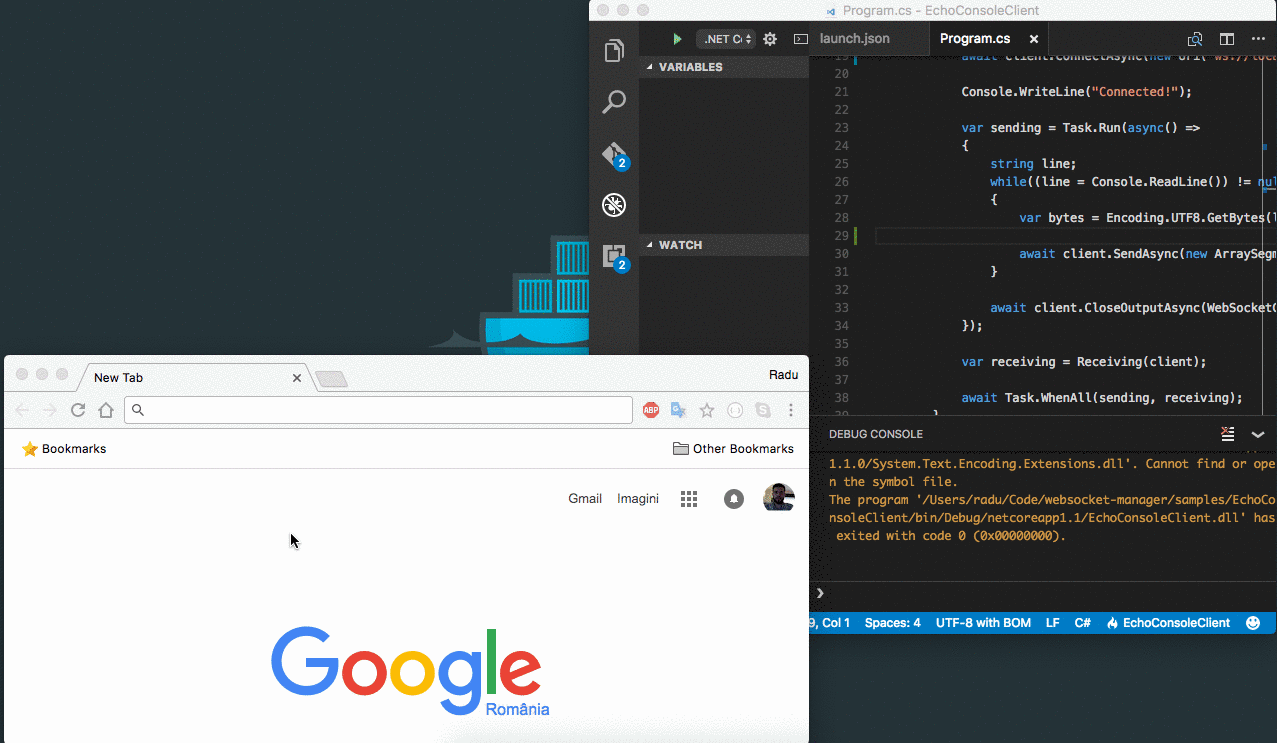
You can also use a C# console client to connect to the application we created.
This sample uses the System.Net.WebSockets namespace which contains the ClientWebSocket class:
public class Program
{
    public static void Main(string[] args)
    {
        RunWebSockets().GetAwaiter().GetResult();
    }

    private static async Task RunWebSockets()
    {
        var client = new ClientWebSocket();
        await client.ConnectAsync(new Uri("ws://localhost:5000/ws"), CancellationToken.None);

        Console.WriteLine("Connected!");

        var sending = Task.Run(async() =>
        {
            string line;
            while((line = Console.ReadLine()) != null && line != String.Empty)
            {
                var bytes = Encoding.UTF8.GetBytes(line);
                await client.SendAsync(new ArraySegment<byte>(bytes), WebSocketMessageType.Text, true, CancellationToken.None);
            }

            await client.CloseOutputAsync(WebSocketCloseStatus.NormalClosure, "", CancellationToken.None);
        });

        var receiving = Receiving(client);

        await Task.WhenAll(sending, receiving);
    }

    private static async Task Receiving(ClientWebSocket client)
    {
        var buffer = new byte[1024 * 4];

        while(true)
        {
            var result = await client.ReceiveAsync(new ArraySegment<byte>(buffer), CancellationToken.None);

            if(result.MessageType == WebSocketMessageType.Text)
                Console.WriteLine(Encoding.UTF8.GetString(buffer, 0, result.Count));

            else if(result.MessageType == WebSocketMessageType.Close)
            {
                await client.CloseOutputAsync(WebSocketCloseStatus.NormalClosure, "", CancellationToken.None);
                break;
            }
        }
    }
}
At this point there is no high level client for WebSockets, so this is how you manage the connection in a .NET client application.
Note that both the Chat application and this console client sample must be running.
Conclusion
In this article we started from the low-level API for managing WebSocket connections, and created a connection manager that can be used as an ASP .NET Core 3 middleware. While the result itself should not be used for any production purposes, it served as a good experiment for understanding how to manage WebSocket connections in .NET Core 3.
Thanks for reading!